

App Attestation
App Attestation is a service of the DeviceCheck framework and, to quote the documentation, is used to ensure that the requests your server receives come from legitimate instances of your app.
Why bother?
Today, it is easier than ever to intercept an application’s traffic. Even on a device, without any sophisticated setup. You can download Proxyman from the App Store and read the HTTPS traffic of all apps that don’t implement any protection like certificate pinning or other measures.
Once you see the requests being made, you can also access header information such as access keys or API tokens.
While access has become trivial, the value of those tokens has never been higher. More and more applications use services from cloud providers like Google, Firebase, etc. Especially since the introduction of GPT-style services providing access to generative models, these paid services have been heavily integrated. If someone hijacks an access token and uses it outside of your application, they can make your cloud service bill explode.
How does it improve security?
App Attestation does not protect your app’s communication from being intercepted. What it does is let your server tell whether a request was made by a genuine, unmodified copy of your app running on real Apple hardware, or by something else, like a script replaying captured traffic or a tampered build.
It does this with a hardware-backed key pair that lives in the Secure Enclave of the device. Apple certifies that this key belongs to a valid instance of your app. Your app then uses that key to sign requests, and your server checks the signatures. Every attestation and every assertion embeds a one-time challenge from your server, which makes captured traffic worthless: even if an attacker gains access to an access token and a signed payload, they can’t reuse it. Imagine that your requests can only be sent once.
How does it work?
Before we get to the implementation, let’s take a look at the big picture and the players involved.

- Your Service - in my examples this will be a Vapor backend providing REST services, but it can be any other framework of your choice.
- App Attest Service - in the implementation part you will see that this presents itself as a local framework. But in fact, it is making remote calls to Apple when certifying a key.
- Your App - nothing fancy here. A usual iOS app making HTTP requests.
The complete sample code for this article is available on GitHub: the iOS client and the Vapor backend. The code shown below lives on the rest-with-app-attest branch of the client and the app-attestation branch of the server.
Step 1: Generate a key pair
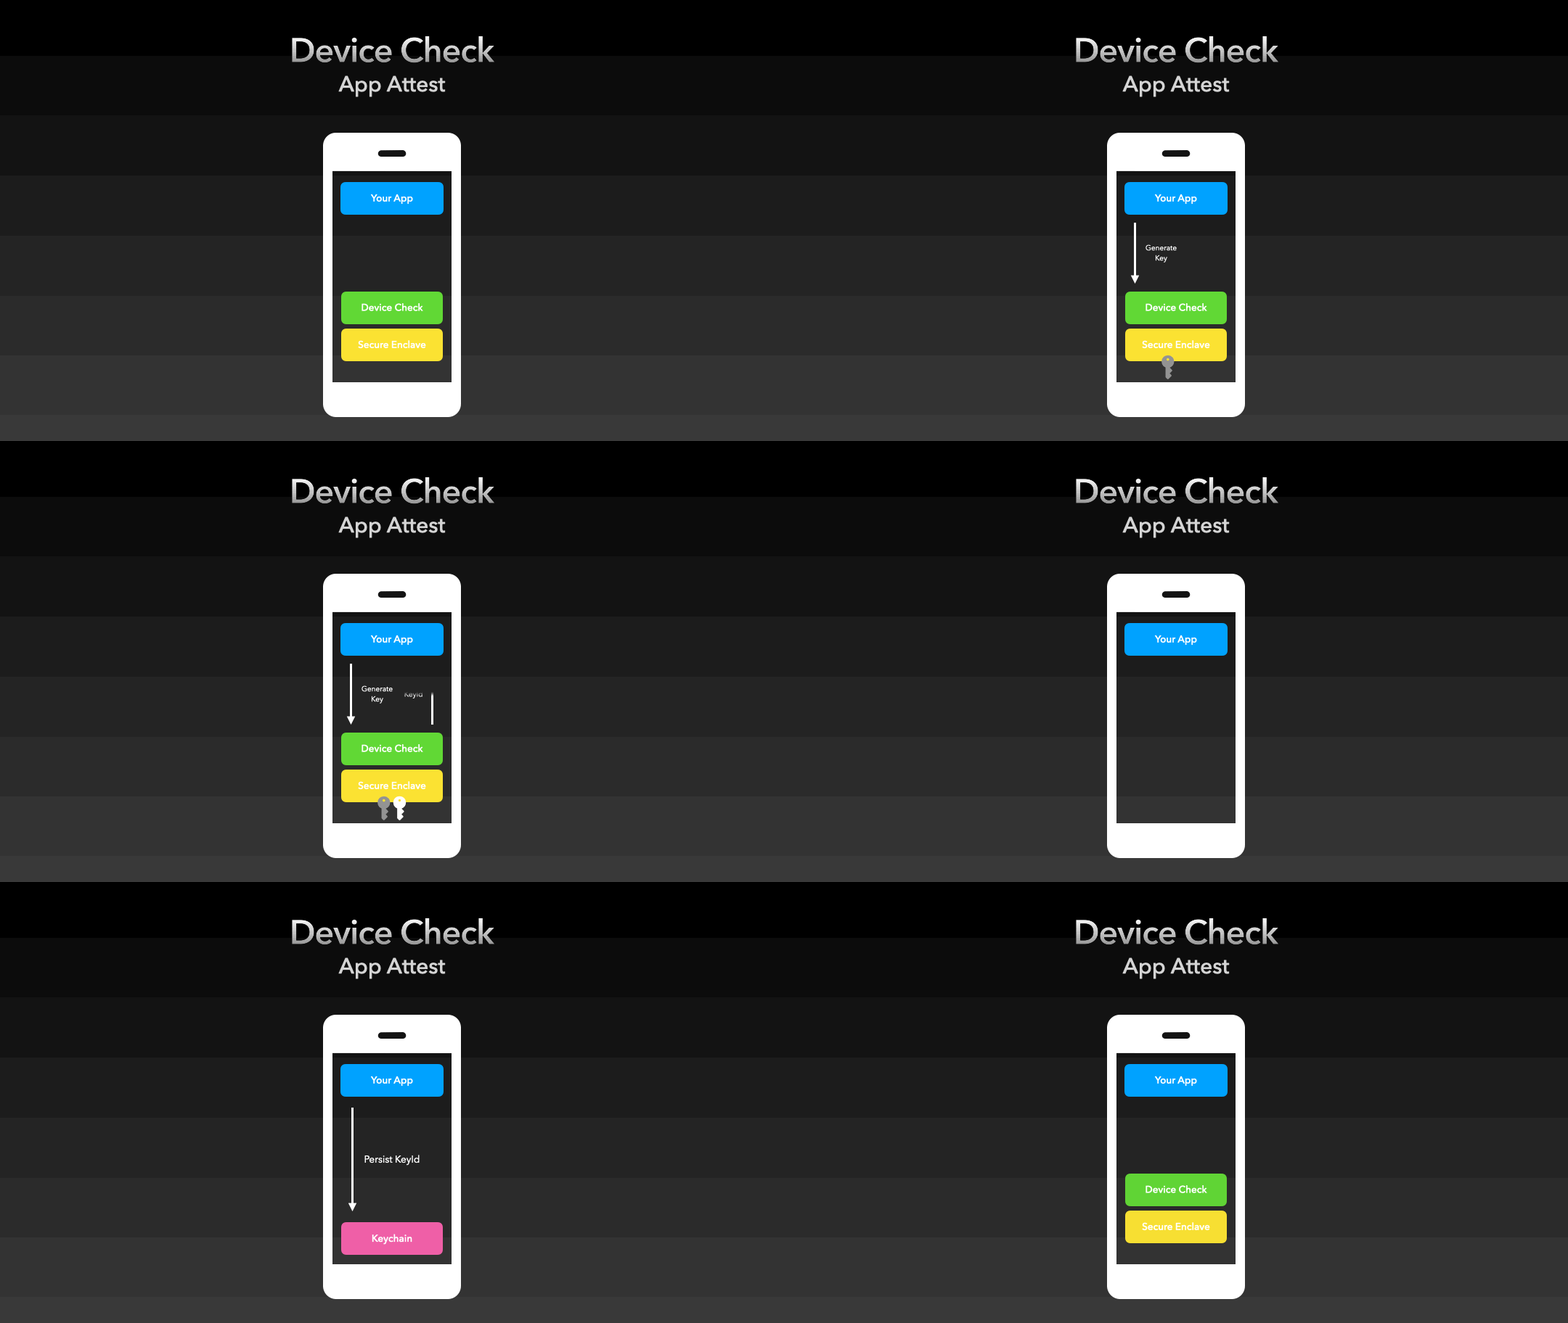 The first step is to generate a private and public key that will be used in the attestation process. Fortunately, the DeviceCheck framework does this for us. It interacts with the Secure Enclave and returns a key identifier, which is just a reference to the generated key.
We store this key identifier for later use. You can use any storage you prefer, as long as it’s persistent. There is no way to get the identifier back once you lose it, and no way to use the key without it. In this example it will be the keychain.
import DeviceCheck

guard DCAppAttestService.shared.isSupported else {
    // Fail gracefully
    return
}

let keyId = try await DCAppAttestService.shared.generateKey()

keychain.attestationKeyId = keyId
One thing needs to be noted here: In line 3, we make sure that our device supports App Attestation. While every current iPhone and iPad supports attestation, not every target does. isSupported returns false on the Simulator and on the Mac, including Mac Catalyst and iOS apps running on Apple silicon. Most app extensions don’t support it either, even if isSupported says otherwise. Apple only lists Action, extensible SSO and watchOS extensions as supported.
Your server needs to know about this as well. If a device can’t attest, your server can’t require assertions from it. In the sample, the client falls back to the unprotected endpoint in that case. What you do with those clients is a product decision. You could serve them a reduced feature set, for example.
Also, Apple asks you to generate one key per user account and device, not per app installation. Keys don’t survive a reinstallation, a device migration or a restore from backup, so be prepared to start over from step 1 in these cases.
Step 2: Fetch a challenge
 Before talking to the App Attest service, we first need to get a challenge from our backend. A hash of this challenge will be included in the resulting attestation object. This is what prevents replay attacks.
I will skip showing you how to send a simple HTTP request to fetch the challenge, and instead show you how to implement the challenge generation on the Vapor side:
import Crypto

struct Challenge: Content {
    let id: UUID
    let data: Data
}

var challenges: [UUID: Data] = [:]

func createChallenge() -> Challenge {
    let id = UUID()
    let challenge = Data((0..<32).map { _ in UInt8.random(in: .min ... .max) })

    challenges[id] = challenge

    return Challenge(id: id, data: challenge)
}
We create 32 truly random bytes. Swift’s default random number generator is backed by the system’s cryptographically secure source, so this is fine to use. Apple asks for a challenge of at least 16 bytes, so that guessing it is infeasible. A common shortcut you’ll find in examples, and one I used myself in the sample repo, is Data(AES.GCM.Nonce()). Be aware that this nonce is only 12 bytes long, which is below Apple’s minimum.
We also generate a UUID to identify the challenge and store both. Since the challenge is included in the attestation object, we need to keep it around for later validation.
To keep things simple, in this example I use an in-memory dictionary. In a real deployment, two more things matter: challenges must be one-time, so remove a challenge from storage as soon as it has been used for a validation, and they should expire after a short time so the dictionary doesn’t grow forever.
Step 3: Create the attestation

With all the preparations out of the way, we can finally proceed to create an attestation for our key pair.
import CryptoKit
import DeviceCheck

let keyId = keychain.attestationKeyId

let challenge = await fetchChallenge()
let hash = Data(SHA256.hash(data: challenge.data))

let attestation = try await DCAppAttestService.shared.attestKey(keyId, clientDataHash: hash)
Using our key identifier and a hash of the retrieved challenge, we call the DCAppAttestService to create our attestation. This is the call that goes out to Apple’s servers.
Two errors deserve special handling here. If the call throws DCError.serverUnavailable, Apple couldn’t be reached. Retry later with the same key and the same hash. For any other error, discard the key identifier and generate a new key the next time. The sample client does exactly that by removing the key identifier from the keychain on failure.
Apple also mentions that this method is rate limited across all installations of your app. If you’re rolling App Attest out to an existing app with a large user base, enable it gradually instead of for everybody at once.
Step 4: Validating the attestation

The next step, and depending on your use case this may be the last step, is to present the attestation object to your server.
There is nothing special to do on the app side. We send the attestation object to our service using a regular POST request. In addition to the attestation object, we include the identifier of the challenge we retrieved earlier and our key identifier in the request.
struct AttestationRequest: Codable {
    let attestation: Data
    let keyID: Data
    let challengeID: UUID
}
One small thing to watch out for: generateKey() hands you the key identifier as a String. That string is the Base64 encoding of the SHA256 hash of the public key. The server side library we’ll use expects it as Data, so we decode it with Data(base64Encoded:) before sending it.
Validation, on the other hand, is something else. Fortunately, Apple documents the necessary steps in great detail. Among other things, you need to decode CBOR, walk a certificate chain up to Apple’s App Attest root certificate, and compare a couple of hashes. To implement the server-side validation, I can recommend using Ian Sampson’s AppAttest framework, which does all of this for you.
import AppAttest

let attestation: Data = ...
let keyID: Data = ...
let challengeID: UUID = ...

guard let challenge = challenges.removeValue(forKey: challengeID) else {
    throw Abort(.badRequest)
}

let request = AppAttest.AttestationRequest(attestation: attestation, keyID: keyID)
let appID = AppAttest.AppID(teamID: "83Z139DVZ2", bundleID: "com.example.myapp")

let result = try AppAttest.verifyAttestation(challenge: challenge, request: request, appID: appID)

attestations[keyID] = result
We receive the attestation object, key and challenge identifier from our client’s request. With the challenge identifier we can load the persisted challenge and use it in the validation process. With the given data we create an AttestationRequest and let the AppAttest framework do its magic. The App ID is the combination of your team identifier and the bundle identifier of your app, exactly as shown in the Certificates, Identifiers & Profiles section of your developer account.
However, the term request is somewhat misleading. The validation does not send a request to Apple. It is merely a request to the framework and happens entirely on the server.
If validation succeeds, the result contains the public key of the attested key pair and a receipt. Store the result on your server, associated with the key identifier and the user. You’ll need the public key to verify assertions later on. The receipt can be used for server-to-server calls to Apple to obtain a fraud metric, which is out of scope for this article.
There is one more thing to know about validation. Attestations created during development are tagged with a different environment than attestations created by a build from TestFlight or the App Store. Your server has to expect the right one. The AppAttest framework handles both, but if you roll your own validation, keep an eye on the aaguid field.
Step 5: It depends…

What happens next depends heavily on your use case. If you are protecting access to a one-time resource, such as a download of some premium content, you are done with your attestation workflow. If you had a positive validation of the attestation object, your server is talking to a legitimate instance of your app, and you can respond with your premium content.
If, on the other hand, your use case involves continuing to exchange critical communications, i.e., expensive or critical state changes, the DeviceCheck framework has you covered and provides a method to protect your requests while limiting overhead: Assertions
After successfully verifying a key’s attestation, your server can require the app to assert its legitimacy for any or all future server requests.
Step 6: Creating assertions

An assertion is a signature. Your app takes the data of a request, hashes it and asks the App Attest service to sign that hash with the private key we attested earlier. Because the private key never leaves the Secure Enclave, nobody outside of your app on that very device can produce a valid signature.
Notice a difference in the diagram: The App Attest service now lives inside the phone. Unlike attestation, creating an assertion is a local operation. No round trip to Apple is involved, which is why assertions are cheap enough to attach to every sensitive request.
The flow is almost identical to creating the attestation. We fetch a fresh challenge, hash the data we want to sign and call generateAssertion instead of attestKey.
import CryptoKit
import DeviceCheck

let keyId = keychain.attestationKeyId

let challenge = await fetchChallenge()
let clientData = challenge.data
let hash = Data(SHA256.hash(data: clientData))

let assertion = try await DCAppAttestService.shared.generateAssertion(keyId, clientDataHash: hash)
The data we sign is called client data. In the sample, the client data is just the challenge, which is the minimum needed to make the assertion unique. Apple recommends going one step further and including the actual request payload in the client data, for example by encoding the request parameters together with the challenge as JSON. That way, the server can verify that the parameters weren’t tampered with in transit, and an attacker can’t take a valid assertion and attach it to a different request.
Again, we send everything the server needs to verify the assertion. This time, the client data has to be part of the request, since the server needs to recompute its hash:
struct AssertionRequest: Codable {
    let assertion: Data
    let keyID: Data
    let challengeID: UUID
    let clientData: Data
}
In the sample client, the assertion request is embedded into the body of the actual API call, in this case a POST request to /asserted-samples.
Two more things to note. First, assertions require an attested key. Calling generateAssertion with a key that hasn’t been attested yet, or whose attestation your server rejected, will fail with DCError.invalidKey. Second, there is no limit on how many assertions you can create with a key. Nevertheless, Apple recommends reserving them for requests at sensitive moments in your app’s life cycle, such as downloading premium content or triggering paid third-party services.
Step 7: Validating assertions
On the server, validating an assertion is simpler than validating an attestation. There is no certificate chain to walk anymore. We already trust the public key stored in step 4, so all we have to do is verify a signature and a couple of fields.
import AppAttest

let assertion: Data = ...
let keyID: Data = ...
let challengeID: UUID = ...
let clientData: Data = ...

guard let challenge = challenges.removeValue(forKey: challengeID) else {
    throw Abort(.badRequest)
}

guard let attestation = attestations[keyID] else {
    throw Abort(.badRequest)
}

let previousAssertion = assertions[keyID]

let request = AppAttest.AssertionRequest(
    assertion: assertion,
    clientData: clientData,
    challenge: clientData
)

let result = try AppAttest.verifyAssertion(
    challenge: challenge,
    request: request,
    previousResult: previousAssertion,
    publicKey: attestation.publicKey,
    appID: appID
)

assertions[keyID] = result
Again, we use the AppAttest framework. This time it needs a bit more input:
- The challenge we handed out to the client, looked up by its identifier and removed from storage in the same go, so it can’t be used twice.
- The public key from the attestation we stored in step 4. Without a prior attestation for this key identifier, there is nothing to verify against, and the request is rejected.
- The client data the app signed. The framework hashes it and checks that the signature is valid for it.
- The challenge embedded in the client data. The framework compares it to the stored challenge. Since our client data is the challenge, we pass the same value for both. If you include the request payload in the client data as Apple recommends, extract the challenge from it here.
- The previous assertion result for this key, if there is one.
The last point is worth a closer look. Every time the Secure Enclave signs an assertion, it increments a counter that is included in the signed data. The framework checks that the counter is higher than the one from the previous assertion, or greater than zero on the very first one. This is a second line of defense against replay attacks, independent of the challenge. Even if a challenge would somehow be accepted twice, an assertion with a stale counter is rejected. That’s why we store the result of every successful verification.
If the validation throws, the request is not coming from a valid instance of your app, or is being replayed. Reject it. In the sample, the endpoint answers with 403 Forbidden.
Things to keep in mind
Before you ship this, a couple of practical points I ran into or found in the documentation:
- The Simulator doesn’t support App Attest. Neither does the Mac. You need a physical iPhone or iPad to test the flow end to end, and your app needs a registered App ID.
- Development and production are separate environments. Keys, attestations and receipts from one can’t be used in the other. Builds from Xcode use the development environment by default, TestFlight and App Store builds always use production. You can force production during development with the
com.apple.developer.devicecheck.appattest-environmententitlement. Make sure your server can tell the two apart if you need to support both. - Keys don’t survive reinstallation. If the key identifier you stored no longer works, expect
DCError.invalidKey, throw it away and start over at step 1. Try to limit new key generation to these cases. Apple uses the number of keys per device as a fraud signal. - Challenges are one-time and should expire. Use a fresh one for every attestation and every assertion, delete it after use and don’t let them live forever.
- App Attest isn’t a silver bullet. It proves your server is talking to your app on a real device. It doesn’t protect against a legitimate copy of your app being driven by automation, and it doesn’t encrypt or hide anything. Combine it with the usual measures: authentication, TLS, rate limiting and a healthy dose of suspicion on the server.
Wrapping up
That’s it. With a key pair, one attestation and an assertion per sensitive request, your backend can be confident that it is handing out its valuable goods to your app, and not to a script that harvested an API key from intercepted traffic.
All the code from this article can be found in the sample repositories:
- AppAttestation-Sample-Client - the iOS app, branch
rest-with-app-attest - AppAttestation-Sample-Server - the Vapor backend, branch
app-attestation
Both repositories also contain branches for the alternatives I looked at along the way: plain DeviceCheck tokens and Firebase App Check.
Useful links
- Apple: Establishing your app’s integrity
- Apple: Validating apps that connect to your server
- Apple: Preparing to use the App Attest service
- WWDC ‘21: Mitigate fraud with App Attest and DeviceCheck
- Ian Sampson’s AppAttest library for server-side validation
- Oliver Binns’ demo and slides from his NSLondon talk
- Matt Nelson-White’s article on server-side validation